Showing posts with label ugly. Show all posts

Wednesday, August 18, 2010

SO Override HOWTO

Since I started eating my own dog food (but more about that later), I've met with the same problem many of other DZ users already have: the fact that system is not quite that accessible. Easy to control, yes, but not accessible. You can't just push a button passing by the thermostat in the hallway.

And the worst situation you may find yourself in is when you're asleep or away, and someone in the house wants things warmer or colder. Oh no, you don't want that (yeah, and that tooth had to be removed anyway).

But there is a solution.
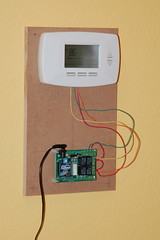
Piggyback


Granted, totally ugly, but totally dependable.

How It Works

When you connect the relay board, you connect it not directly to HVAC cable or the unit itself, but as a piggyback to an existing thermostat. Let's consider RTH7500 (above) as an example.

Determine Wiring Scheme

Find the manual for your thermostat (here's a link to RTH7500 manual). Find the diagram for your specific installation (mine is on page 10, "Connect wires: Heat Pump").

Thus, you now know what wires to connect. For the example above I needed red, orange, yellow and green.
Careful! your HVAC installer may have used different colors, you have to look at the markings, not at the wire color!
Get yourself a piece of thermostat cable, or just find appropriate wires.

Connect the relay board

Red wire is the common wire, connect it to all "common" contacts. Connect other wires as appropriate.

Caveats

There are two common thermostat connection schemes - (white and yellow) vs. (yellow or white and orange) or (yellow or white and blue). Orange and blue wires are mode selectors - you need to know which exactly is the scheme your thermostat uses. For example, RTH7500 uses yellow plus orange ("energize to cool") and I connected it to NC contacts, since most of the year the thermostat is in cooling mode. Your mileage may vary.

Congratulations, you're done

So how does all this help you? Simple.

First of all, you set the thermostat much higher (assuming cooling mode) than it is necessary (if you take a look at the big picture, you'll see that the thermostat is set to 90°F) and set it to permanent hold. Then when you're not around and there is a desperate need to change settings, all that needs to be done is
  • Press the "Use Schedule" button (or the equivalent);
  • (optional) Disconnect the power to the relay board.
Added benefit is that whenever anyone is compelled to do so, the home climate will return to abominable state it was before, and the temptation will disappear for a long time.

PS: I am working on a more permanent solution, right now.

Friday, February 12, 2010

FAQ: Getting Google Calendar Dependencies

In order to successfully build dz3-scheduler-gcal, you need some extra dependencies, and in order to run it, you need some more (both come from gdata-java-client library). Following are the steps to make them available (implies wget(1) installed on your system):

cd /tmp && \
wget http://gdata-java-client.googlecode.com/files/gdata-src.java-1.40.2.zip && \
cd /usr/local/src && \
unzip /tmp/gdata-src.java-1.40.2.zip
The /usr/local/src location is hardcoded into dz3-scheduler-gcal/pom.xml, change it if it doesn't work for you.

1.40.2 was the latest version available at the time the development of dz3-schedule-gcal was finalized, feel free to replace it with the latest available - but make sure individual dependency version numbers match.

Why So Ugly?

Because gdata-java-client hasn't been made available to the Maven Central Repository yet.

If you want to make it happen and know how to do it, please do so. If you find out that dependencies in question are already in the central repository by the time you read this, please let me know.

Sunday, July 27, 2008

Extra Insulation For The Poor

Extreme circumstances call for extreme measures.

If you are not happy with your single pane windows, but don't have enough money to replace them with something better, and willing to live with the ugliness of a temporary solution (in these times of failing employment and skyrocketing prices of everything this may be quite acceptable), here's a way to deal with it:

Install a sheet of expanded polystyrene into the window.

They come in different sizes, the most convenient would be 2'x4' (or 4'x8' if you have a truck).

4x8 2" thick costs (at the moment of writing at my location) about $23. 2x4 costs less than $6.

2" thick sheet is R-7.8 (for comparison, a single pane window is R-1, triple pane window is R-3).

Thinner sheets cost less, but have significantly lower R value, so you be the judge of what you need.

These sheets are not completely opaque - they let just about the same amount of light as a heavy curtain, with the added benefit of preserving the spectrum (with a slight blue hue because of blue lettering on them).

A nice tool to cut these sheets with, should that be necessary, is a Japanese (pull style) double blade saw such as Vaughan Bear - it's a complete topic in itself, you'll love using this tool, much more exact and rewarding than a comparable size push saw.

Installing these makes a hell of a difference.