During DZ2 development it became clear tat there's no such thing as too much instrumentation data. Hence, DZ3 was architected in such a way that any object that produces DataSample<E extends Number> can have their data logged.
Here's an example how you can log temperature sensor data (this has been added to the bottom of this example):
<!-- Loggers -->
<bean id="rrdbase" class="java.io.File">
       <!-- This is the path in the file system. If in doubt, make it absolute --/>
       <constructor-arg type="java.lang.String" value="./rrd"/>
</bean>
<bean id="rrdtool" class="java.io.File">
       <constructor-arg type="java.lang.String" value="/usr/bin/rrdtool"/>
</bean>
<bean id="rrdlogger" class="net.sf.jukebox.datastream.logger.impl.rrd.RrdLogger" init-method="start">
       <constructor-arg index="0" type="java.util.Set">
               <set>
                       <ref bean="temperature_sensor-6EE055000000"/>
                       <ref bean="temperature_sensor-cpu1"/>
                       <ref bean="temperature_sensor-cpu2"/>
                       <ref bean="temperature_sensor-mobo"/>
                       <ref bean="temperature_sensor-sda"/>
                       <ref bean="temperature_sensor-sdb"/>
               </set>
       </constructor-arg>
       <constructor-arg index="1" type="java.io.File" ref="rrdbase"/>
       <constructor-arg index="2" type="java.io.File" ref="rrdtool"/>
</bean>
And here's the data that it produced during its first 3 hours of operation: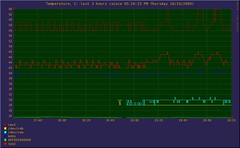
UPDATE (2009/11/08): Added comment to rrdbean constructor argument - thanks to David for clarification.
Thursday, October 29, 2009
DZ3 Data Logger: Logging *Everything*

DZ3 Configuration: Teaser
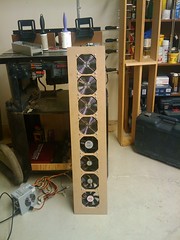
DZ3 is about to start working as a forced ventilation controller for a computer located in a closed, but ventilated compartment under a staircase. Picture on the left is of the computer itself (fan assembly is visible in the background). Picture on the right is of the fan assembly that provides ventilation (by the way, not loud at all).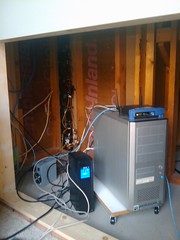
And below is the configuration that reads three lm_sensors supported sensors and one 1-Wire sensor (mapped to the file system by owfs-fs) and feeds the data to the rest of the system. If you want to see it, copy & paste somewhere else - there's no way to make it readable here.
<?xml version="1.0" encoding="UTF-8"?>
<beans xmlns="http://www.springframework.org/schema/beans"
    xmlns:xsi="http://www.w3.org/2001/XMLSchema-instance"
    xsi:schemaLocation="http://www.springframework.org/schema/beans
           http://www.springframework.org/schema/beans/spring-beans-2.5.xsd">

    <!-- Sensors -->
    <bean id="temperature_sensor-6EE055000000" class="net.sf.dz3.device.sensor.impl.ShellSensor" init-method="start">
        <constructor-arg index="0" value="6EE055000000"/>
        <constructor-arg index="1" value="1000"/>
        <constructor-arg index="2" value="/bin/cat /mnt/onewire/28.6EE055000000/temperature12|tr -s ' '"/>
    </bean>
    <bean id="temperature_sensor-cpu1" class="net.sf.dz3.device.sensor.impl.ShellSensor" init-method="start">
        <constructor-arg index="0" value="cpu1"/>
        <constructor-arg index="1" value="1000"/>
        <constructor-arg index="2" value="/usr/bin/sensors|grep Int|tr -s ' '|cut -f 3 -d ' '|tr -d '+°C'"/>
    </bean>
    <bean id="temperature_sensor-cpu2" class="net.sf.dz3.device.sensor.impl.ShellSensor" init-method="start">
        <constructor-arg index="0" value="cpu2"/>
        <constructor-arg index="1" value="1000"/>
        <constructor-arg index="2" value="/usr/bin/sensors|grep AMD|tr -s ' '|cut -f 3 -d ' '|tr -d '+°C'"/>
    </bean>
    <bean id="temperature_sensor-mobo" class="net.sf.dz3.device.sensor.impl.ShellSensor" init-method="start">
        <constructor-arg index="0" value="mobo"/>
        <constructor-arg index="1" value="1000"/>
        <constructor-arg index="2" value="/usr/bin/sensors|grep M/B|tr -s ' '|cut -f 3 -d ' '|tr -d '+°C'"/>
    </bean>

    <!-- Thermostats -->
    <bean id="pid_controller_6EE055000000" class="net.sf.dz3.controller.pid.SimplePidController" scope="prototype">
        <constructor-arg index="0" value="22.5"/>
        <constructor-arg index="1" value="1"/>
        <constructor-arg index="2" value="0"/>
        <constructor-arg index="3" value="0"/>
        <constructor-arg index="4" value="0"/>
    </bean>
    <bean id="thermostat-6EE055000000" class="net.sf.dz3.device.model.impl.ThermostatModel">
        <constructor-arg type="java.lang.String" value="1-Wire 6EE055000000"/>
        <constructor-arg type="net.sf.dz3.device.sensor.TemperatureSensor" ref="temperature_sensor-6EE055000000"/>
        <constructor-arg type="net.sf.dz3.controller.pid.AbstractPidController" ref="pid_controller_6EE055000000"/>
    </bean>

    <bean id="pid_controller_cpu1" class="net.sf.dz3.controller.pid.SimplePidController" scope="prototype">
        <constructor-arg index="0" value="56"/>
        <constructor-arg index="1" value="1"/>
        <constructor-arg index="2" value="0"/>
        <constructor-arg index="3" value="0"/>
        <constructor-arg index="4" value="0"/>
    </bean>
    <bean id="thermostat-cpu1" class="net.sf.dz3.device.model.impl.ThermostatModel">
        <constructor-arg type="java.lang.String" value="CPU1"/>
        <constructor-arg type="net.sf.dz3.device.sensor.TemperatureSensor" ref="temperature_sensor-cpu1"/>
        <constructor-arg type="net.sf.dz3.controller.pid.AbstractPidController" ref="pid_controller_cpu1"/>
    </bean>

    <bean id="pid_controller_cpu2" class="net.sf.dz3.controller.pid.SimplePidController" scope="prototype">
        <constructor-arg index="0" value="44"/>
        <constructor-arg index="1" value="1"/>
        <constructor-arg index="2" value="0"/>
        <constructor-arg index="3" value="0"/>
        <constructor-arg index="4" value="0"/>
    </bean>
    <bean id="thermostat-cpu2" class="net.sf.dz3.device.model.impl.ThermostatModel">
        <constructor-arg type="java.lang.String" value="CPU2"/>
        <constructor-arg type="net.sf.dz3.device.sensor.TemperatureSensor" ref="temperature_sensor-cpu2"/>
        <constructor-arg type="net.sf.dz3.controller.pid.AbstractPidController" ref="pid_controller_cpu2"/>
    </bean>

    <bean id="pid_controller_mobo" class="net.sf.dz3.controller.pid.SimplePidController" scope="prototype">
        <constructor-arg index="0" value="38"/>
        <constructor-arg index="1" value="1"/>
        <constructor-arg index="2" value="0"/>
        <constructor-arg index="3" value="0"/>
        <constructor-arg index="4" value="0"/>
    </bean>
    <bean id="thermostat-mobo" class="net.sf.dz3.device.model.impl.ThermostatModel">
        <constructor-arg type="java.lang.String" value="Motherboard"/>
        <constructor-arg type="net.sf.dz3.device.sensor.TemperatureSensor" ref="temperature_sensor-mobo"/>
        <constructor-arg type="net.sf.dz3.controller.pid.AbstractPidController" ref="pid_controller_mobo"/>
    </bean>

    <!-- Dampers: None for now -->

    <!-- Zone Controllers -->
    <bean id="zone_controller-mx" class="net.sf.dz3.device.model.impl.SimpleZoneController">
        <constructor-arg type="java.util.Set">
            <set>
                <ref bean="thermostat-6EE055000000"/>
                <ref bean="thermostat-cpu1"/>
                <ref bean="thermostat-cpu2"/>
                <ref bean="thermostat-mobo"/>
            </set>
        </constructor-arg>
    </bean>

    <!-- HVAC Units -->
    <bean id="unit-mx" class="net.sf.dz3.device.model.impl.UnitModel">
        <constructor-arg type="java.lang.String" value="mx"/>
        <constructor-arg type="net.sf.dz3.device.model.ZoneController" ref="zone_controller-mx"/>
    </bean>

    <!-- Damper Controllers: None for now -->

</beans>
Wednesday, October 28, 2009
DZ3 Configuration, Part 1
This is a simplified representation of how things are connected in DZ3: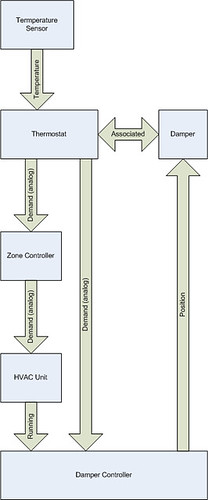
Every entity can act as a signal producer, and as a signal consumer. Exceptions are temperature sensors that can only be producers, and dampers that can only be consumers (unless there's instrumentation feedback).
Temperature Sensor
- Consumes nothing
- Produces Temperature
- Consumes Temperature
- Produces Zone Demand
- Has 1:1 relation with the Damper
- Consumes Zone Demand
- Produces Total Demand
- Consumes Total Demand
- Produces Running
- Consumes Zone Demand, Running
- Produces Damper Position
- Has to be aware about Thermostat:Damper relations
- Consumes Damper Position
- Produces nothing
- Has a 1:1 relation with the Thermostat
- Consumes everything
At this moment, the DZ3 container is based upon Spring Framework. If you are familiar with Spring, then a quick look at the sample configuration will tell you everything you need to know (provided you're somewhat familiar with the the code base).
If not, stay tuned.
DZ3 Runner
Release early, release often
-- ESR
There is no established place for shell components of DZ3 yet, so, for lack of a better place, here's a script that will run a valid DZ3 code base that you've just built on any Unix system (watch long lines):#! /bin/sh
LIBDIR=${HOME}/.m2/repository
COMMONS_LOGGING=${LIBDIR}/commons-logging/commons-logging/1.1.1/commons-logging-1.1.1.jar
LOG4J=${LIBDIR}/log4j/log4j/1.2.15/log4j-1.2.15.jar
SPRING=${LIBDIR}/org/springframework/spring/2.5.6/spring-2.5.6.jar
DZ=${LIBDIR}/net/sf/dz3
DZ_VERSION=3.0
JUKEBOX=${LIBDIR}/net/sf/jukebox
JUKEBOX_VERSION=6.0-RC2
# Reverse order, so inheriting classes have a priority (good for configuration)
export CLASSPATH="./${your_configuration_directory}:\
${DZ}/dz3-model/${DZ_VERSION}/dz3-model-${DZ_VERSION}.jar:\
${DZ}/dz3-common/${DZ_VERSION}/dz3-common-${DZ_VERSION}.jar:\
${DZ}/dz3-sensors/${DZ_VERSION}/dz3-sensors-${DZ_VERSION}.jar:\
${DZ}/dz3-spring/${DZ_VERSION}/dz3-spring-${DZ_VERSION}.jar:\
${JUKEBOX}/jukebox-common/${JUKEBOX_VERSION}/jukebox-common-${JUKEBOX_VERSION}.jar:\
${JUKEBOX}/jukebox-datastream/${JUKEBOX_VERSION}/jukebox-datastream-${JUKEBOX_VERSION}.jar:\
${JUKEBOX}/jukebox-jmx/${JUKEBOX_VERSION}/jukebox-jmx-${JUKEBOX_VERSION}.jar:\
${JUKEBOX}/jukebox-sem/${JUKEBOX_VERSION}/jukebox-sem-${JUKEBOX_VERSION}.jar:\
${JUKEBOX}/jukebox-service/${JUKEBOX_VERSION}/jukebox-service-${JUKEBOX_VERSION}.jar:\
${COMMONS_LOGGING}:\
${LOG4J}:\
${SPRING}"
#echo $CLASSPATH
# Remember that arguments on the command line are relative to the root of CLASSPATH
# -Dcom.sun.management.jmxremote is needed to allow accessing DZ with JMX management tools
$JAVA_HOME/bin/java \
-Dcom.sun.management.jmxremote \
-cp $CLASSPATH \
net.sf.dz3.runtime.Container $*
COMING UP
Runtime configuration
DZ3 Quickstart
(This post is sticky, will be updated as DZ3 codebase grows, and will eventually be migrated to the main site when DZ3 is sufficiently mature)
Below is what you have to do to have DZ3 code base installed on your system. It goes without saying that having a working installation of JDK 1.6 is a prerequisite. I distrust any implementation other than Sun's, but it's been many years since I've tried anything else, YMMV. (Update: found an article describing how to install Sun Java on Ubuntu).
You may want to copy and paste it into a shell scropt and see what happens when you run it. Watch long lines.
NOTE: You need to have Google Calendar dependencies on file system in order to build everything. Either follow simple instructions, or remove or comment out thedz3-schedule-gcalmodule fromdz3-master/pom.xml.
Fedora 10+
#! /bin/shyum install maven2
yum install svn
cd ${your_development_directory}
svn co \
https://jukebox4.svn.sourceforge.net/svnroot/jukebox4/trunk/jukebox-master \
jukebox-master
(cd jukebox-master && mvn install)
svn co \
https://servomaster.svn.sourceforge.net/svnroot/servomaster/trunk/servomaster-common \
servomaster-common
(cd servomaster-common && mvn install)
svn co \
https://diy-zoning.svn.sourceforge.net/svnroot/diy-zoning/trunk/dz3-master \
dz3-master
cd dz3-master
# This test will most probably fail on your box because it is system specific
rm dz3-sensors/src/test/java/net/sf/dz3/device/sensor/impl/ShellSensorTest.java
mvn install
You're done. DZ3 codebase is installed on your box.
NOTE: installed. In order to connect servo controller based actuators you will also need to buildservomaster-serialorservomaster-usb(depending on your hardware) which need to be checked out and built separately - but this is beyond the "quickstart".
Ubuntu 9.04
The only difference with the above is that instead of executingyum install maven2you execute
yum install svn
sudo apt-get install maven2
sudo apt-get install subversion
Mac OS X
(to the best of my understanding of explanations of a Mac expert):- Install Development packet, it'll give you Subversion, among other things
- Install
macports - Run
"port install maven2"
Update: I'm told that both Maven and Subversion are preinstalled on Mac OS X starting with version 10.5.
Windows
You're on your own here. The only advice I can give is to use TortoiseSVN and download and install Maven manually. And of course, shell scripts won't work - unless you're running Cygwin, but if that's the case, then you don't need my advice.UPDATING CODE BASE
The only thing you have to do is to executesvn update followed by mvn clean install in jukebox-master and dz3-master directories. Don't forget to kill the shell sensor test case, or modify it to suit your system - should be trivial. Something like this:#! /bin/sh
cd ${your_development_directory}
(cd jukebox-master && svn update && mvn clean install)
cd dz3-master
svn update
rm dz3-sensors/src/test/java/net/sf/dz3/device/sensor/impl/ShellSensorTest.java
mvn clean install