View DZ Installations in a larger map
Since project inception in 2001, quite a few people installed DZ in their houses. Somehow, I didn't think of visualizing the community until very recently - but now I'm working on rectifying the situation.
Above is the map of known DZ installations, updated with new information as it comes. For all you know, there may be someone next door to you that can help you with the process, should you require assistance.
Saturday, July 31, 2010
Around The World

DZ 3.6 Release Is Out
- Download from SourceForge
- Download from Google Code
- Download from Ohloh
- Get source code from Subversion
- Get the hardware and start enjoying your home
Changes since 3.5.3
New Features

- XBee ZB hardware can now be used to control HVAC actuators. Read more...
- Seed Depot's Relay Shield is supported, along with any other designs that utilize XBee's digital output functionality.
DZ 3.6 Release Is Out
- Download from SourceForge
- Download from Google Code
- Download from Ohloh
- Get source code from Subversion
- Get the hardware and start enjoying your home
Changes since 3.5.3
New Features
- XBee ZB hardware can now be used to control HVAC actuators. Read more...
- Seed Depot's Relay Shield is supported, along with any other designs that utilize XBee's digital output functionality.
Friday, July 30, 2010
Teaser: XBee Wireless Temperature Sensor
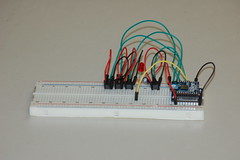
Above: XB24-ZB with four TMP36 analog temperature sensors connected to XBee's analog inputs.
The reason four sensors are connected is: comparison and statistical analysis.
It remains to be seen how good or bad analog readings are, and how easy it is to compensate for these imperfections in software.
Credit
This design is based on a similar one, with a few minor differences:- TMP36 is used instead of LM34 (the only reason being that I had some spares laying around). Obviously, the result calculation is different. Wide selection of similar sensors (TMP35, TMP37, LM35), result would be just about the same, save for value recalculation;
- Incidentally, this allowed to get rid of the voltage regulator because whereas LM34 requires +5V to +30V power, TMP36 is fine from +2.7V to +5.5V, hence, the same 3.3V power can be used to feed both XBee and TMP36;
- Caveat is, at +70°C TMP36 output voltage reaches maximum allowable voltage for ZB series ADC, 1.2V. I don't think it's a problem because the intended usage is indoor temperature measurement, if your indoor temperature reaches +70°C, you'll have bigger problems to worry than a possibly damaged XBee. But keep this in mind if you're planning to use these sensors to monitor a temperature of, say, a water heater or air coming out from the furnace;
- 330Ohm resistor added to ASSOC LED to restrict the LED's operating current (might want to use 1K and higher if your LED is too bright for you).
More to come.
Thursday, July 29, 2010
DZ XBee HOWTO
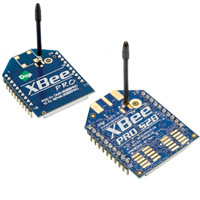
Now that XBee is supported, let's see how to make it work.
Bill of Materials
- XBee ZB low power ZigBee Module w/ chip antenna or similar (wire or external antenna, but that would probably be an overkill);
- UartSB V2.2 or similar ("adapter" hereinafter). XBee Explorer Regulated or XBee Explorer USB will also work (WARNING: read the note on SeedStudio products);
- Relay shield (4 relays).
I would highly recommend to buy an extra XBee radio and an adapter if you have never worked with XBees before - it'll save you a lot of grief because you'll be able to monitor the network status activity. You see, the relay shield doesn't come with network status and activity lights, so unfortunately, you'll be flying blind and will have to re-plug XBee modules into adapter every time you're not sure what is going on.
Hence, recommended quantities are - three XBee modules, two adapters and one relay shield (add extra XBee module + relay shield pairs if you have more than one HVAC unit, one pair per unit) - starting at $110.80 before shipping.
Minimum quantities - two XBee modules, one adapter and one relay shield ($73.90 before shipping).
Before you say that's expensive, think how much you will spend breaking walls to wire cables, then patching them back, texturing and painting. Not even talking about time spent on all that exciting work.
Keep in mind that some suppliers have high lead times - I've seen as high as two weeks.
Power
Note that the power supply is not included into the bill of materials. The relay shield requires 9V DC power - you either might have one handy already, buy a cheap one wherever you fancy, or just use a 9V battery (the relay shield has screw on contacts for that). I don't know yet how long the relay shield is going to last on a battery with normal HVAC usage pattern, will find out and report.Setup
Countless XBee tutorials exist, so I'm going to skip this part - suffice to say, get your XBees lined up and talking to each other.
DZ specific XBee setup
You need to flash one XBee module (the one on the adapter) with the Coordinator API firmware (when you get familiar with X-CTU software, this will become self-explanatory). Make sure you read the module configuration and flash correct firmware. After you flash API firmware, it won't be possible to use a dumb terminal to control the XBee anymore (limitation of ZB series), so make sure you're done with setting up communications correctly before you do that - like I said, extra XBee and an adapter will help a lot from here on.IMPORTANT: Make sure you set AP=2 and write changes. The reason for this is that xbee-api library used for low level communications doesn't work with AP=1, and fails to report when AP=1, or forcibly change the module state to AP=2.
Baud Rates
Don't bother changing the port speed from default 9600 baud. DZ is more than happy with that speed, but if you change it, you might run into trouble remembering what it is next time you try to connect to XBee via an adapter.DZ Configuration
XBee devices are configured in exactly the same way as 1-Wire devices: using a device factory. Here's a snippet that will produce a working switch (0013A200.4062AC98 is the 64 bit hardware address of my XBee module plugged into the relay shield, substitute it with yours):<bean id="device_factory" class="net.sf.dz3.device.sensor.impl.xbee.XBeeDeviceFactory" init-method="start"> <constructor-arg index="0" value="/dev/ttyUSB0"/> </bean> <bean id="switch_0013A200.4062AC98_0" factory-bean="device_factory" factory-method="getSwitch"> <constructor-arg value="0013A200.4062AC98:D0"/> </bean>
NOTE: Relays are marked COM1 to COM4, but channels to access them correspond to actual XBee channels - D0 to D3. This is done so that all XBee digital outputs can be controlled - D0 to D8, and P0 to P3.
Congratulations, you're done
From here on, things are just as usual - use the reference to switch_0013A200.4062AC98_0 as you would have with a 1-Wire based device.
UPDATE: Adjusted description to match the improved channel addressing.
UPDATE: This article describes the switch setup, see the Teaser: XBee Wireless Temperature Sensor for information about sensor setup.
Subscribe to:
Posts (Atom)